Platform Settings
Configure Chat360 platform controls for webhooks, API keys, ticket routing, blocked numbers, DND, compliance, testing and WhatsApp widgets.
1. Webhooks
Webhooks allow you to send real-time event data from Chat360 to external systems such as CRM platforms, backend services, or analytics tools.
When a selected event occurs, Chat360 sends an HTTP POST request to your configured endpoint.
Navigate to:
Settings → Webhooks
i. Webhooks Page
The Webhooks page displays:
Name – Webhook identifier
Event Type – Events that trigger the webhook
Webhook Responses – View webhook responses
Status – Enabled or Disabled
Actions – Edit or Delete
You can also access Webhook Logs to monitor delivery status and debug failures.
ii. Add New Webhook
Click Add New Webhook to configure:
Name – Enter a unique webhook name (max 100 characters)
URL – Destination endpoint URL (must be a public HTTPS endpoint)
Event – Select the event that triggers the webhook
Secret Key – Authentication key passed in request headers
iii. Custom Fields
You can add additional key-value pairs using Add More.
These fields help:
Pass static metadata
Identify environments (production / staging)
Map internal system data
iv. Test Webhook
Click Test to send a sample request to your endpoint to verify connectivity and response handling.
v. Save Webhook
Click Save to create the webhook.
Once saved, enable it using the status toggle.
vi. Failed Webhook Email
The Send Failed Webhook Email option allows you to notify users when webhook delivery fails.
Configuration:
Add up to 3 email addresses
Press Enter after each email
Click Send to trigger notification
This helps teams quickly identify integration issues.
vii. Event Notifier
The Event Notifier allows Chat360 to automatically send WhatsApp templates when specific external events occur.
viii. Setup Event Notifier
Navigate to:
Settings → Webhooks → Event Notifier
ix. Create Webhook Trigger Event
Configuration fields:
Event Title – Name of the trigger event
Request Type – HTTP method (e.g., POST)
Archived Days – Data retention period
x. Configure Variables
Add parameters using Add More.
These variables are passed in the API request body.
xi. API Reference
A sample cURL request is generated including:
API key in headers
JSON request format
Click Create to save the event and use the generated API.
2. Callback Webhook URL
Set Callback Webhook URL
Steps to add Webhook:
Step 1 -
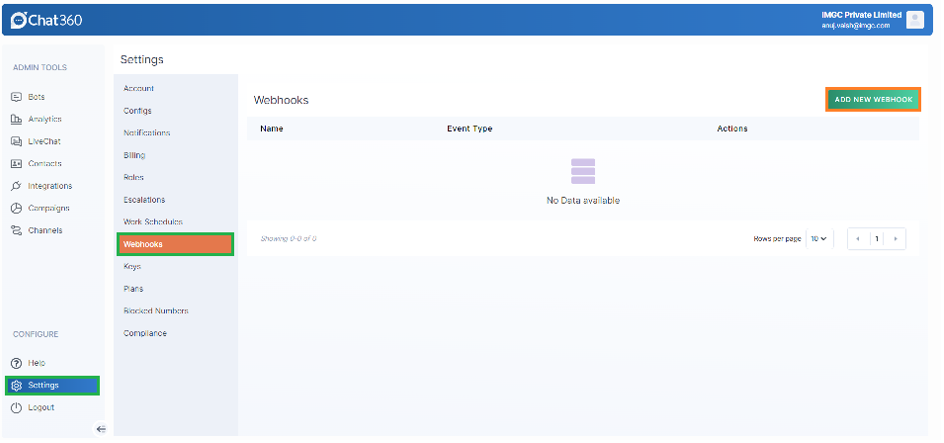
To add a Webhook, you have to navigate to “Settings” that you can find in the “Configure” section.
In settings, navigate to Webhooks and then, click on "ADD NEW WEBHOOK".
Step 2 -
This will open a pop-up window, in which, you have to fill in the fields (Name, URL, Event Type, Condition) you can Test/Save the webhook here.
Set a callback URL for the event responses :
We have introduced a new feature where user can add a webhook and capture the responses. We have added the below events:
1. Sample Webhook Payload Format
POST / HTTP/1.1
Host: testnewaswell.requestcatcher.com
Accept: text/plain
Content-Type: application/json

{
 "m_id": "wamid.HBgMOTE4Nzk2NDgyNzkyFQIAEhgWM0VCMDBBM0U1MkZGQzMxRjM1MENCRgA=",
 "source": "Chat360",
 "wab_id": "{Business Number} ",
 "created": "2026-05-21 07:16:18.160996",
 "user_id": 2XX,
 "timestamp": "2026-05-21 07:16:12",
 "event_type": "{Event Type}",
 "receiver_num": "{Receiver Number}",
 "wab_response": {
   "messages": [
     {
       "text": {
         "body": "I want mango and strawberry"
       },
       "type": "text",
       "from_user_id": "IN.1511546733645***"
     }
   ],
   "client_number": "{Client Number} "
 },
 "client_number": " {Client Number}",
 "receiver_name": "Gaurav",
 "event_response_id": "428e5023-0375-434a-90f3-bxxxxxxxxxx"
}
2. Template message sent
This event triggers when a user sends a template message.
Response:
{
  "event_response_id": "e184970f-86b5-429a-9106-6c225eac3243",
  "event_type": "template_message_sent",
  "m_id": "gBEGkYY4ZIVGAgkjk7a9LCjDa8s",
  "wab_id": "{WhatsApp Business Number}",
  "receiver_num": "{Client Number}",
  "template_id": "a9a5d0ab-d6bf-4a78-9081-5998c5d924c6",
  "template_name": "daily_message_openingtime",
  "template_type": "image",
  "source": "API",
  "template_text": "Hi, Welcome to The Dining Club.",
  "response_id": "e6d8bee0-001e-4ad2-a673-599c06b8261d",
  "status": "sent",
  "user_id": "763",
  "user_email": "{User Email}",
  "user_role": "AM",
  "created": "2023-05-13 05:28:21.183286"
}
3. Sent message delivered
This event triggers when your sent message is delivered to the user.
Response:
{
  "event_response_id": "broadcast_98765",
  "event_type": "sent_message_delivered",
  "wab_id": "{WhatsApp Business Number}",
  "receiver_num": "{Client Number}",
  "m_id": "msg_67890",
  "timestamp": "2024-02-20 14:30:23",
  "status": "delivered",
  "user_id": 214,
  "created": "2026-05-21 07:08:49.172665"
}
4. Sent message read
This event triggers when your sent message is read by the user.
Response:
{
  "event_response_id": "broadcast_54321",
  "event_type": "sent_message_read",
  "wab_id": "{WhatsApp Business Number}",
  "receiver_num": "{Client Number}",
  "m_id": "msg_12345",
  "timestamp": "2024-02-20 14:30:23",
  "status": "read",
  "user_id": 214,
  "created": "2026-05-21 07:08:49.172637"
}
5. Message received
This webhook triggers whenever a user sends a message to your WhatsApp API number.
Response:
{
  "event_response_id": "58a647c3-0e6f-46hh-8fe1-e5b156dca1e5",
  "event_type": "message_received",
  "wab_id": "{business_number}",
  "receiver_num": "{client_number}",
  "receiver_name": "Haritima",
  "m_id": "ABCDkZVpcQhWAgs-sHPLi81t8GcJ6Q",
  "timestamp": "2023-05-13 05:20:52",
  "wab_response": {
    "messages": [
      {
        "text": {
          "body": "HI"
        },
        "type": "text"
      }
    ]
  },
  "user_id": 214,
  "created": "2026-05-21 07:08:49.172600"
}
6. Session message sent
This event triggers when a user sends a session message.
Response:
{
  "broadcast_id": "ed8528e6-0667-4b3f-9277-c1c79704c4fc",
  "event_type": "session_message_sent",
  "wab_id": "{WhatsApp Business Number}",
  "receiver_num": "{Client Number}",
  "m_id": "abcdef12345",
  "msg": "Hello, this is a test message!",
  "msg_type": "text",
  "is_media": false,
  "user_id": 214,
  "sender_email": "{User Email}",
  "sender_role": "admin",
  "created": "2025-02-20 12:34:56.789123"
}
7. Lead Capture
This event triggers when a new lead is created.
Note - When an event sent to webhook it expects 200 response to confirm the event was successful. If it does not get the success response then it will be retried 10 more times after that the webhook URL will be inactive and you will get an email notification about this.
3. Keys
The Keys section provides your unique API Key used to authenticate external integrations.
You can copy the key for integration purposes.
Keep the key confidential to prevent unauthorized access.
4. Tickets
The Tickets section allows administrators to create and manage ticket categories.
While creating or editing a category:
Enable Auto Assign
Select a default Team or Agent
Tickets created under the category will automatically be routed to the selected team or agent.
This ensures faster ticket handling.
5. Blocked Numbers
The Blocked Numbers section allows administrators to manage numbers that are restricted from contacting the business.
You can view:
User number
Who blocked it
Block duration
Remaining days
This helps prevent spam and maintain secure communication.
6. DND Numbers
The DND Numbers section allows administrators to manage numbers that should not be contacted during specific time periods.
Features include:
Add numbers
Define DND time periods
View dataset details
Download records
Numbers listed here will not receive messages during configured hours.
7. Compliance
The Compliance section allows you to manage:
Opt-In (Subscriptions)
Opt-Out (Unsubscriptions)
Restricted Keywords
Unsubscribed Users
You can also:
Create compliance policies
View unsubscribed users
Download reports
Import compliance data
8. Testing Numbers
Testing Numbers allow you to test campaigns before launching them.
Add Testing Number
Navigate to Testing Numbers
Click Add New Number
Enter the phone number
Assign a tester name
Save
These numbers simulate real campaign interactions.
9. WhatsApp Redirect
The WhatsApp Redirect feature allows you to integrate a WhatsApp widget on your website.
Setup Steps
Navigate to WhatsApp Redirect
Click Create New Widget
Provide widget name
Link your business number
Select or upload widget icon
Customize Widget
Set widget size
Choose screen position
Enable mobile visibility
Publish Widget
Enter the Website URL
Click Publish
Copy the generated script
Paste it before the closing
</body>tag of your website
After publishing, visitors can directly contact you via WhatsApp.