Converse Email
Go beyond email campaigns with Chat360 Converse. Send at scale, manage two-way conversations, automate campaigns and track customer journeys in real time.
Converse is Chat360's complete email channel solution for managing customer conversations at scale. It combines domain verification, channel configuration, template management, campaign automation, and live customer engagement in one unified platform.
What You Can Do
Send Emails at Scale | Two-Way Conversations |
Launch targeted email campaigns to thousands of customers instantly or on a schedule. | Receive customer replies automatically and manage entire conversations from Chat360. |
Reusable Templates | Track Everything |
Create standardized email templates for consistency and faster campaign creation. | Monitor campaign performance, conversation status, and customer journey in real-time. |
Key Features
Feature | Description | Use Case |
|---|---|---|
Domain Management | Set up and verify your email domains for sending. | Brand consistency, authentication |
Channel Configuration | Configure email channels with inbound/outbound settings. | Support, notifications, promotions |
Template Library | Create and manage email templates with journey tracking. | Consistency, faster campaigns |
Campaigns | Send bulk emails on schedule with detailed tracking. | Marketing, outreach, notifications |
Live Chat | View and reply to customer emails in real-time. | Customer support, live engagement |
Getting Started
Set up Converse in five simple steps. This process takes about 30 minutes including DNS propagation.
1: Add your email domain
Go to Domain Management and add your business email domain .
2: Verify DNS records
Add the CNAME record to your DNS provider. DNS propagation takes 24–48 hours.
3: Create an email channel
Configure the channel with your domain, email addresses, and inbound settings.
4: Create email templates
Build templates for common message types to maintain consistency.
5: Launch your first campaign
Send a test campaign to verify everything works.
info
Start with a small test campaign to verify your domain and channel configuration before sending to your full audience.
Create and Manage Templates
Templates save time and ensure consistent messaging across all your email campaigns.
Why Use Templates
Consistency All emails follow the same format and tone.
Speed Create campaigns in minutes instead of hours.
Compliance Ensure all emails include required legal language.
Journey Tracking Monitor customer interactions at each email stage.
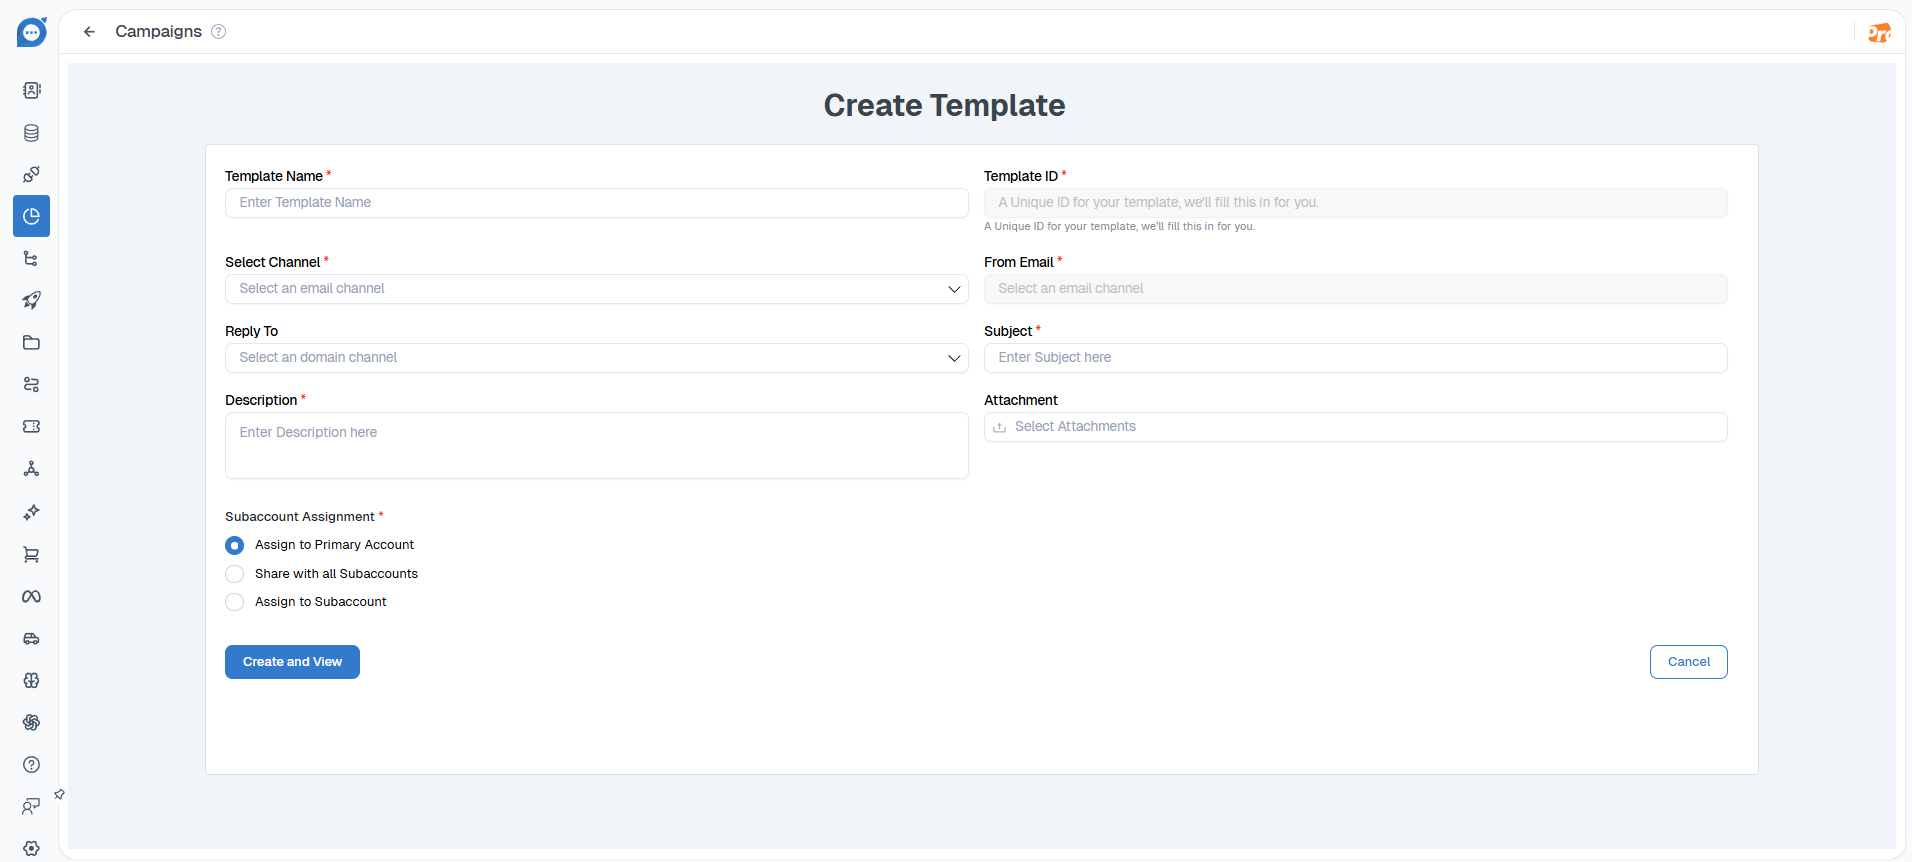
Creating a Template
1: Go to Templates
Navigate to Campaigns → Email → Templates tab.
2: Click "Create New Template"
You'll see the template builder.
3: Fill in Template Details
Complete the following fields:
Template Name – Descriptive name (e.g., "Welcome Email")
Subject Line – Email subject
Email Content – The body of the email
4: Add Journey Steps (Optional)
Track customer interactions:
Sent
Opened
Clicked
Replied
Converted
5: Save Template
Template is now available for use in campaigns.
Common Template Types
Welcome Email : First email to new customers with onboarding info and next steps.
Promotional : Marketing emails with special offers and new product announcements.
Support Response : Auto-response when customer submits a support ticket.
Error/Alert : System errors, security alerts, or critical notifications.
Confirmation : Order confirmation, registration confirmation, booking confirmed.
Feedback Request : Ask customers for reviews, surveys, or feedback.
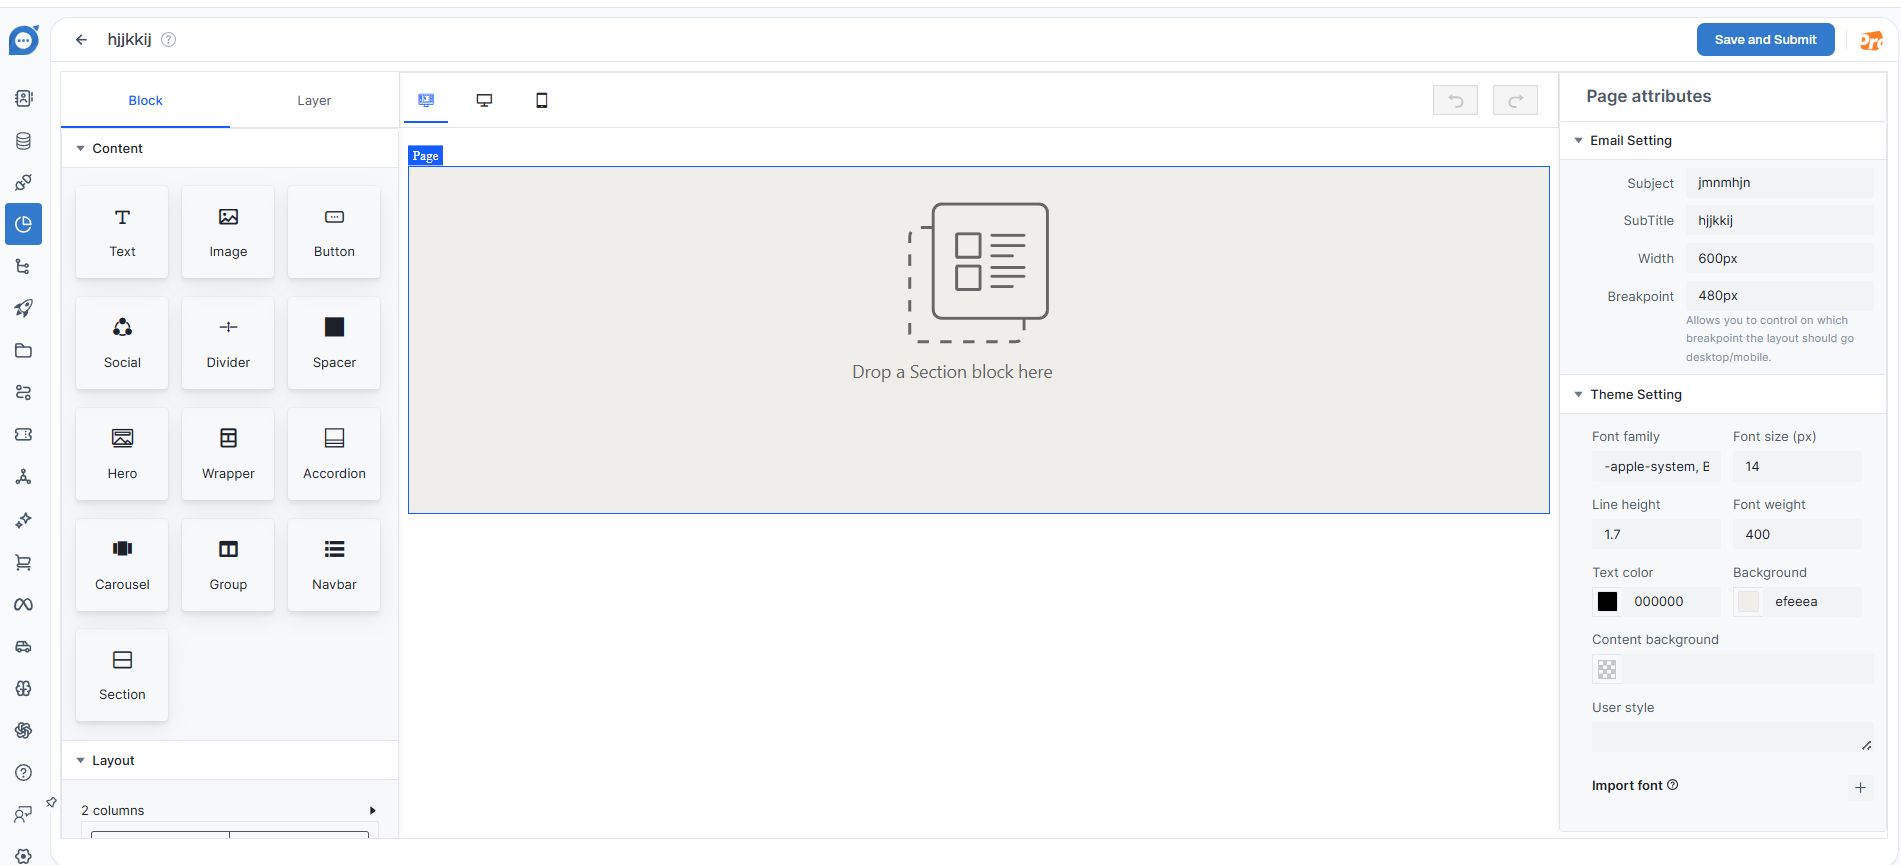
Designing Your Email Layout
Templates use a drag-and-drop email builder. From the block library on the left, drag Sections, Text, Images, Buttons, and other blocks onto the canvas, then use the Page attributes panel on the right to configure the subject, width, breakpoint, and overall theme (fonts, colors, background).
Template Status
Status | Meaning | Can Use in Campaign? |
|---|---|---|
Draft | Template is being created or edited | No |
Pending | Submitted for approval | No |
Approved | Approved and ready to use | Yes |
Rejected | Did not pass approval, see feedback | No |
Best Practices for Templates
Keep subject lines under 50 characters.
Use clear, action-oriented language.
Include your brand name and logo.
Add an unsubscribe link (required by law).
Test templates on mobile devices.
Use personalization variables when available.
info
Create a "Fallback" template for error conditions when your primary template isn't available.
Create and Manage Campaigns
Campaigns let you send emails to large groups of people on a schedule, with full tracking and analytics.
What is a Campaign?
A campaign is a single email send to one or more recipients, campaign includes:
Template selection
Recipient list
Scheduling (immediate or future date)
Performance tracking
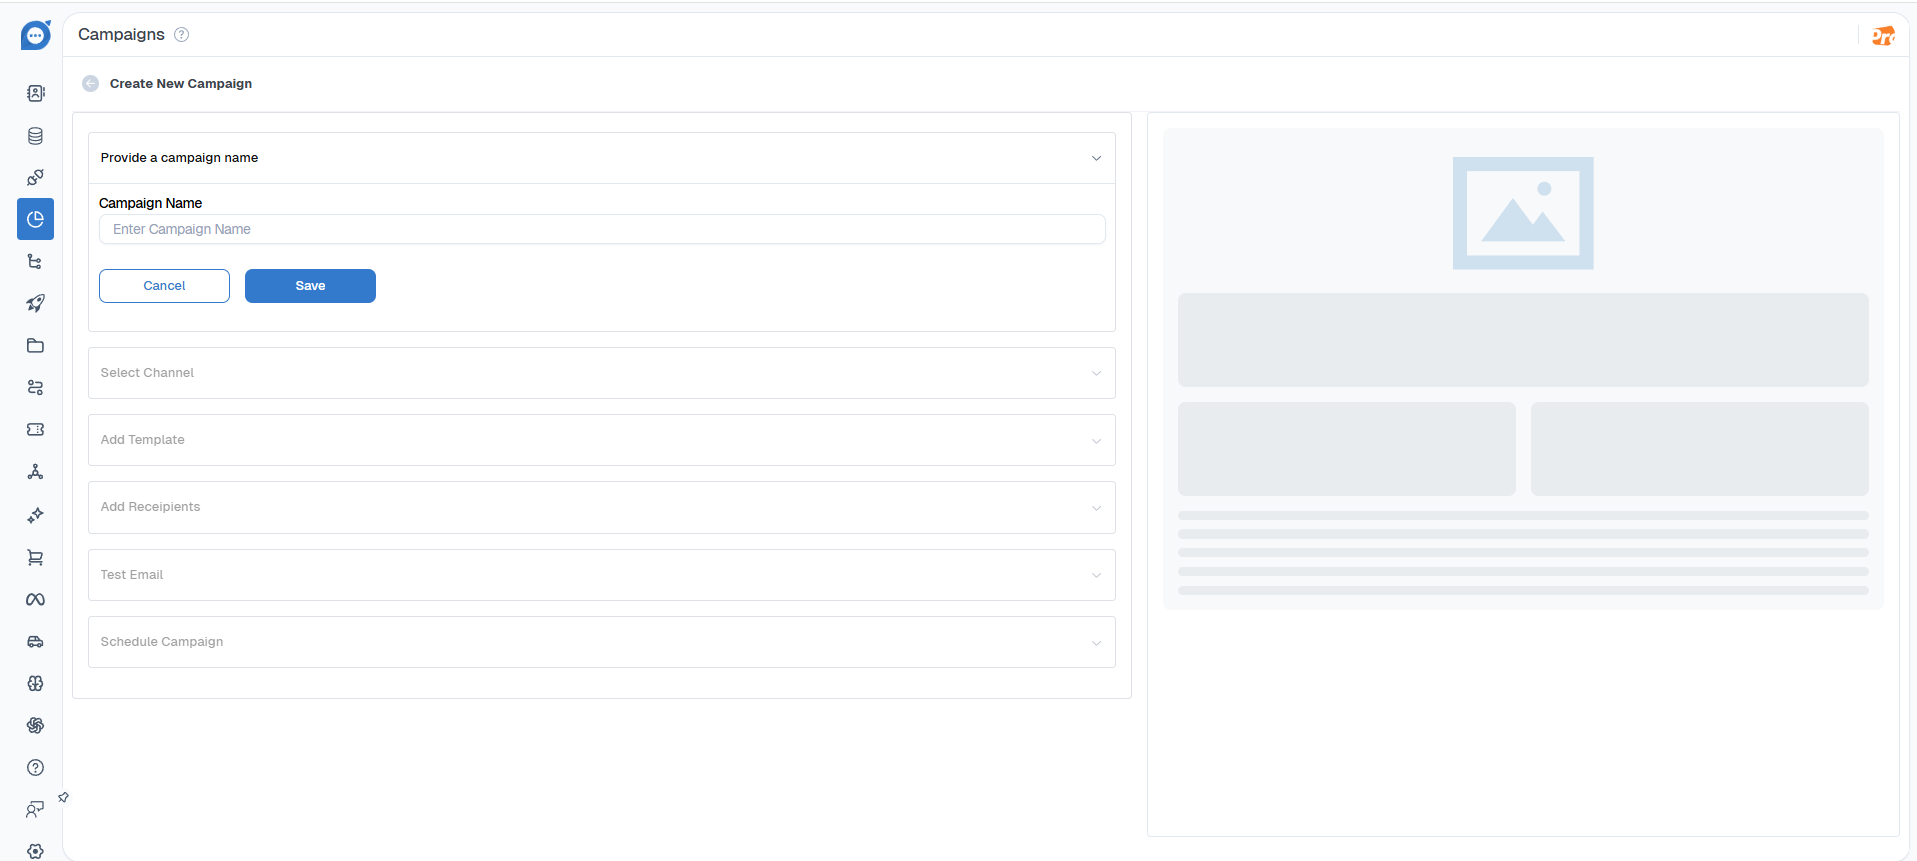
Creating a Campaign
1: Go to Campaigns
Navigate to Campaigns → Email.
2: Click "Create New Campaign"
Opens the campaign builder form.
3: Name Your Campaign
Use a clear name (e.g., "Q4 Promotion", "Welcome New Users")
4: Select Email Channel
Choose which email channel to send from (Support, Sales, etc.)
5: Choose Template
Pick an approved template or create a new one.
6: Add Recipients
Paste email addresses or upload a CSV file.
7: Schedule Send Time
Send immediately or pick a future date/time
8: Review and Send
Preview the email and click Send Campaign.
Campaign Dashboard
The Campaigns page shows all your email campaigns with key metrics.
Metric | What It Means |
|---|---|
Total Campaigns | Total number of campaigns created |
Scheduled | Campaigns waiting to send at a future date/time |
Running | Campaigns currently being sent |
Completed | Campaigns finished sending all emails |
Recipient Count | Number of people who received this campaign |
Status | Current state: Scheduled, Running, Completed, Stopped, Draft |
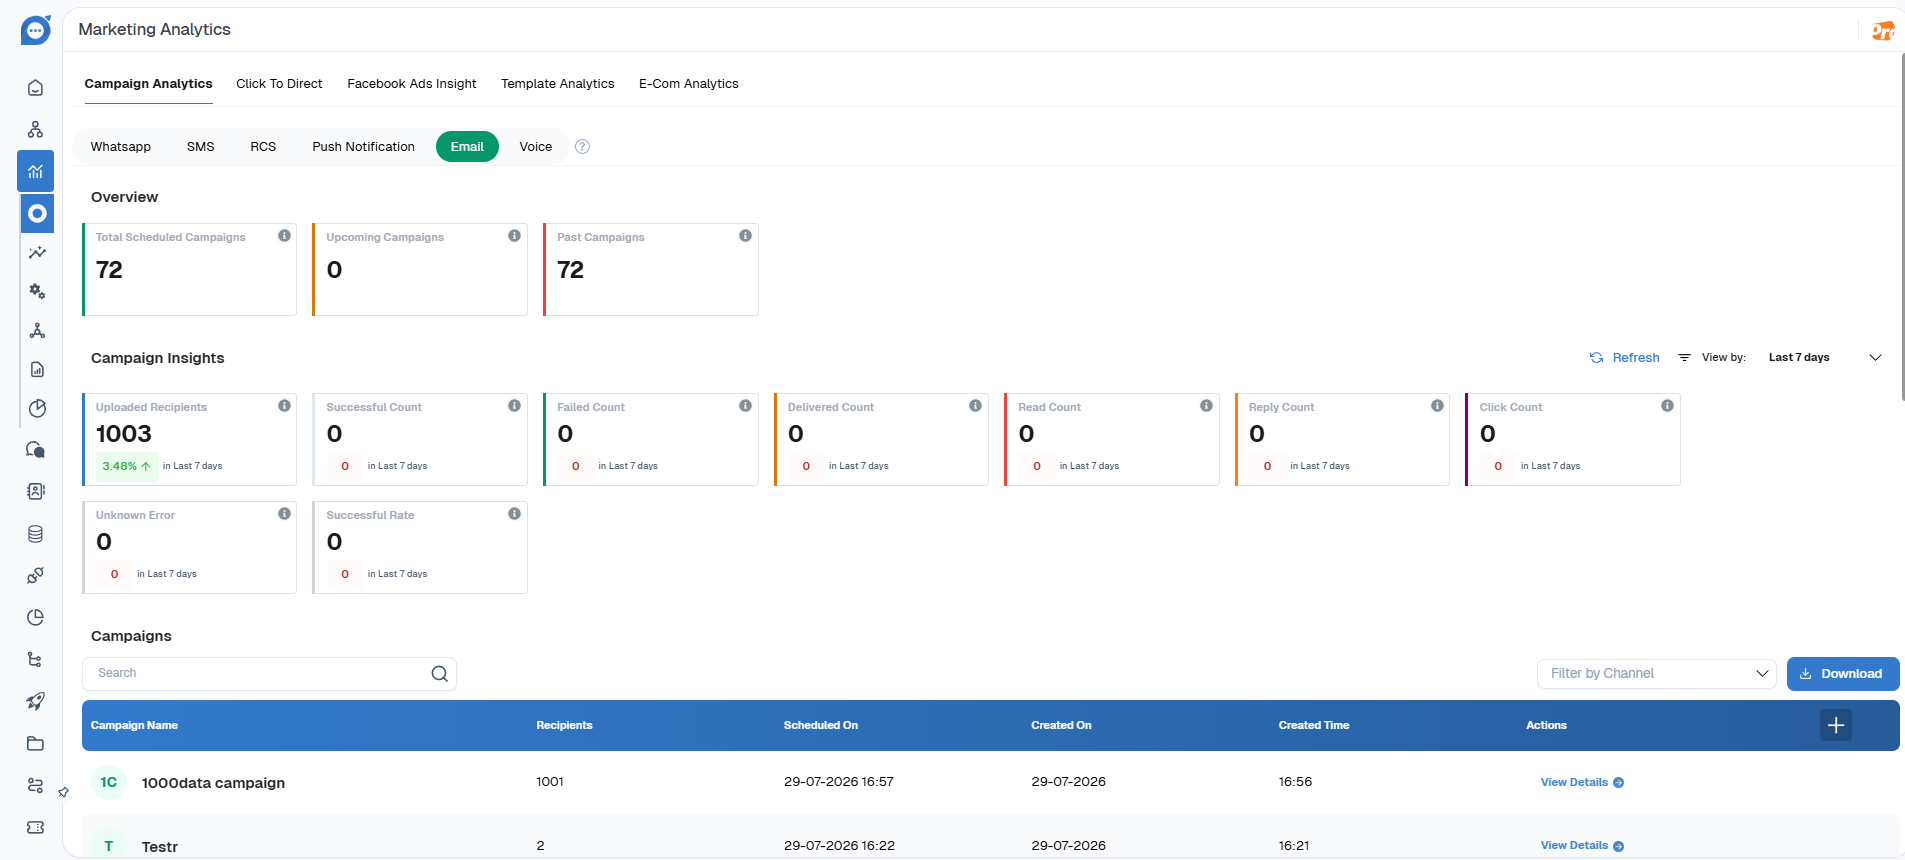
Campaigns Dashboard
Marketing Analytics dashboard for the Email channel showing campaign overview, insights, and campaign list.
Campaign Status Explained
Status | Meaning | Next Step |
|---|---|---|
Draft | Campaign created but not yet submitted | Fill in all details and click Send |
Scheduled | Campaign will send at the scheduled time | Wait for the scheduled time or manually trigger send |
Running | Emails are currently being sent | Monitor progress on the dashboard |
Completed | All emails sent successfully | View analytics and performance metrics |
Stopped | Campaign was manually paused or cancelled | Campaign cannot be restarted; create a new one |
Adding Recipients
You can add recipients in two ways.
Paste Emails : Copy and paste email addresses directly into the recipient field.
Upload CSV : Upload a CSV file with email addresses in the first column. Supports up to 50,000 recipients.
CSV Format Example
customer1@example.com , customer2@example.com, customer3@example.com
info
Test your campaign with a small group first (5–10 emails) to ensure everything looks correct before sending to your full list.
Important
Always verify recipient emails are valid and opted-in. Sending unsolicited emails may violate anti-spam laws.
Live Chat Conversation Window
The Live Chat window lets you see and reply to customer emails in real-time, all from within Chat360.
What is Live Chat?
Live Chat is your email inbox within Chat360.
It shows:
Incoming customer emails from your campaigns
Customer replies to your emails
Full conversation history
Email metadata (sender, subject, date, etc.)
Accessing Live Chat
1: Open Live Chat
Go to Chat360 → Livechat tab.
2: Open a Conversation
Look for "Re: Promotional Activity" or other email subject lines.
Click on any conversation to open it.
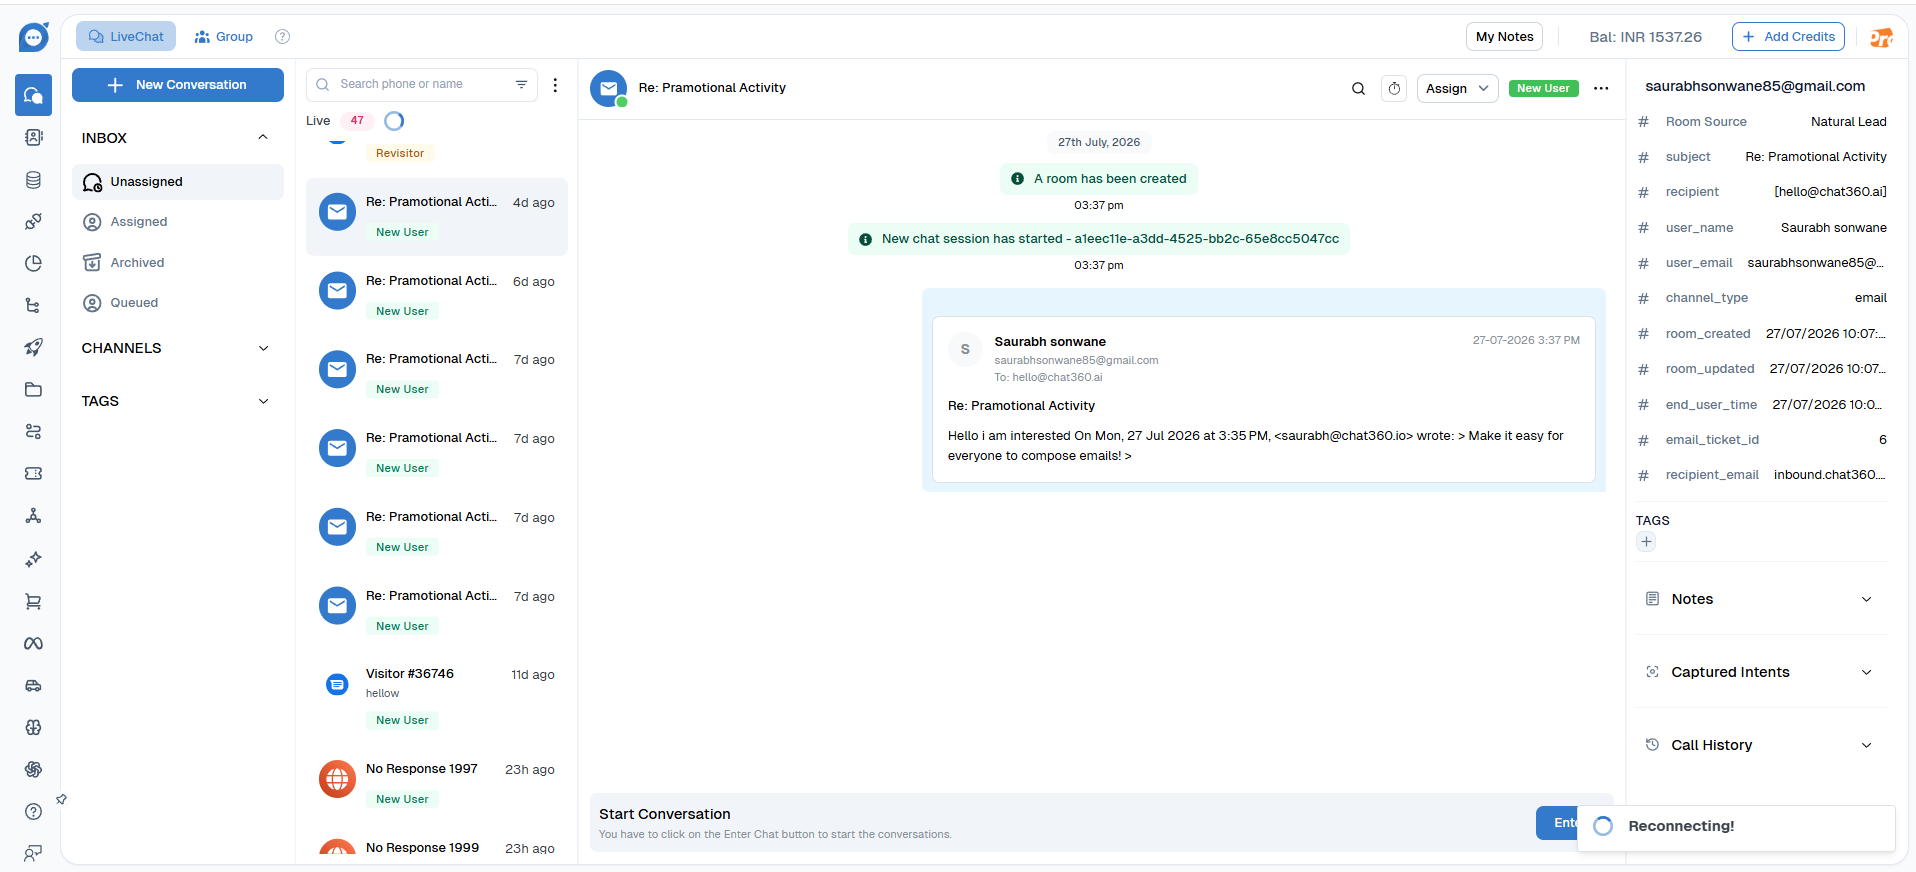
Live Chat Inbox
Live Chat inbox showing the conversation list, email thread, and conversation metadata panel.
Inbox Organization
Section | What It Shows | Action |
|---|---|---|
Unassigned | New emails not yet assigned to anyone | Assign to team member or self |
Assigned | Emails assigned to you or your team | Reply and manage |
Archived | Closed conversations (for reference) | View only |
Replying to Customers
1: Open a Conversation : Click on an email to view the full thread.
2: Read Customer Message : Review the customer's email in the main window.
3: Type Your Reply : Click the text area and compose your response.
4: Click "Send" :Your reply goes directly to the customer's email.
Conversation Management
You can perform several actions on conversations.
Assign : Assign to yourself or a team member.
Add Tags : Tag conversations (Support, Urgent, Follow-up, etc.).
Add Notes : Internal notes visible only to your team.
Archive : Mark conversation as resolved and move to archive.
Search : Find conversations by sender name, subject, or email.
Conversation Metadata
Each conversation shows important information on the right sidebar.
Field | What It Shows |
|---|---|
Room Source | Where this email came from (Email channel) |
Subject | Email subject line |
Recipient | Original recipient email address |
User Name | Name of person who sent the email |
User Email | Sender's email address |
Channel Type | Email channel used for this conversation |
Room Created | When this conversation started |
Tip
Use tags to organize conversations by priority. Create an "Urgent" tag for customer issues that need immediate attention.
Best Practices
Follow these guidelines to get the most out of Converse.
Domain & Authentication
Use Your Brand Domain : Always use your actual business domain (
support@yourcompany.com) instead of generic email providers. This builds trust and improves deliverability.Verify Before Sending : Don't wait until your domain status says "Active" to complete verification. Check back regularly to confirm propagation is complete.
Monitor Domain Reputation : Keep track of bounce rates and spam complaints. High bounce rates indicate a problem with your recipient list.
Channel Management
Separate Channel by Purpose : Create different channels for support, sales, marketing, etc. This helps organize conversations and track performance by type.
Use Consistent Email Addresses : Always send from the same email address within a channel. Customers recognize and trust consistent senders.
Assign Team Members : Rotate inboxes among team members to ensure fast response times and prevent bottlenecks.
Template & Content
Keep Subject Lines Short : Use 40–50 characters. Long subject lines get cut off on mobile devices.
Make CTA Clear : Include a clear call-to-action (button or link). Users should know exactly what you want them to do.
Mobile Optimize : Test all templates on mobile devices. Over 50% of emails are opened on phones.
Include Unsubscribe Link : Always include an unsubscribe link in the footer. It's legally required and reduces spam complaints.
Campaigns & Sending
Test Before Sending : Send a test campaign to 5–10 emails first. Check for formatting issues, broken links, and typos.
Verify Recipient List : Clean your email list regularly. Remove bounced addresses and unsubscribes.
Send at Optimal Times : Tuesday–Thursday at 9 AM typically see highest open rates. Test different times for your audience.
Segment Your Audience : Create campaigns for different customer segments. Personalized emails get better engagement.
Monitor Metrics : Track open rates, click rates, and response rates. Use this data to improve future campaigns.
Customer Engagement
Respond Quickly : Reply to customer emails within 24 hours. Fast responses build trust.
Be Conversational : Write like you're talking to a friend. Avoid corporate jargon and long, complex sentences.
Personalize Responses : Use the customer's name and reference their specific issue. Generic responses feel impersonal.
Provide Clear Next Steps : End every response with what happens next. Customers appreciate clarity about timelines.
Troubleshooting
Common issues and how to fix them.
Domain Verification Stuck
❌ Domain still shows "Pending" after 48 hours
Possible causes
CNAME record not added correctly to DNS
Typo in the CNAME record
DNS provider caching issues
DNS records not yet propagated globally
Solutions
Double-check the CNAME record matches exactly (copy-paste from Chat360)
Verify with your DNS provider that the record was added
Use an online DNS checker tool to verify propagation
Wait another 24 hours (DNS can take time to propagate)
Contact Chat360 support if still not resolving
Emails Not Sending
❌ Campaign status stuck on "Running" or emails not arriving
Possible causes
Domain not verified
Channel not configured correctly
Invalid email addresses in recipient list
Emails being marked as spam by recipients
Solutions
Verify domain status is "Active" (not "Pending" or "Failed")
Check that channel has correct inbound address configured
Validate recipient email addresses (remove bounced addresses)
Send test email to personal email account to check formatting
Check spam folder for emails
Emails Going to Spam
❌ Customers are receiving emails in spam folder
Possible causes
Domain not fully authenticated
No unsubscribe link in template
High bounce rate or spam complaints
Too many links in email
Emails sent to invalid addresses
Solutions
Ensure domain is fully verified with CNAME record
Add unsubscribe link to footer of all templates
Clean recipient list (remove bounced/invalid addresses)
Reduce number of links in email body
Avoid spam trigger words (FREE, WINNER, CLICK NOW, etc.)
Monitor bounce rate - keep it below 2%
Replies Not Appearing
❌ Customer replies not showing in Live Chat
Possible causes
Inbound address not set up correctly
Customer replied to campaign email instead of forwarding
Reply address doesn't match channel configuration
Solutions
Check channel configuration - verify inbound address is correct
Check that customer replied to your email (not forwarded)
Verify the email they replied to came from your Converse channel
Check spam folder to see if reply was misdirected
Template Not Approved
❌ Template stuck on "Pending" or "Rejected"
Possible causes
Missing unsubscribe link
Missing company name/branding
Broken links in email
Missing required legal language
Solutions
Add unsubscribe link to footer
Include your company logo and name
Test all links to ensure they're not broken
Include required privacy/legal language if needed
Review feedback from approval system
Resubmit template for approval
Need Help?
If you have questions or run into issues not covered in this documentation:
Check the Troubleshooting section above for common issues
Review the FAQ for quick answers
Contact Chat360 Support via the in-app help button or email support@chat360.io
Join our Community Slack to connect with other Chat360 users