WhatsApp Campaigns
Create, test and schedule WhatsApp campaigns with approved templates, audience targeting, personalization, automated retries and campaign analytics in Chat360.
The smart campaign feature in chat 360 allows you to send WhatsApp messages to large audiences using pre-approved templates. It is designed for one-time, Scheduled, and recurring campaigns that support structured customer communication workflows.
Before creating a campaign, you must first create a WhatsApp template and get it approved. Once the template is approved, you can use it to schedule and launch campaigns through the Smart Campaign feature.
Steps to set up a WhatsApp campaign
Step 1- Create A Template
Navigate to the Smart Campaign section of the Chat360 dashboard. In WhatsApp campaign section click on “Template tab”
Click on the New Template button.A New Template window will open. Enter the required details, including the Template Name.
Select the appropriate Campaign Category (Marketing,Utility,Authentication) Add the template content and enhance it by attaching relevant media(Images,Videos,Document,Locations, carousels)
Select the preferred Language for the template. Configure the required Buttons (Quick Reply,URL,Phone Number,Coupon Code). Preview the template to verify the content and click “submit for Approval”
Once template is Approved you can start creating the campaign
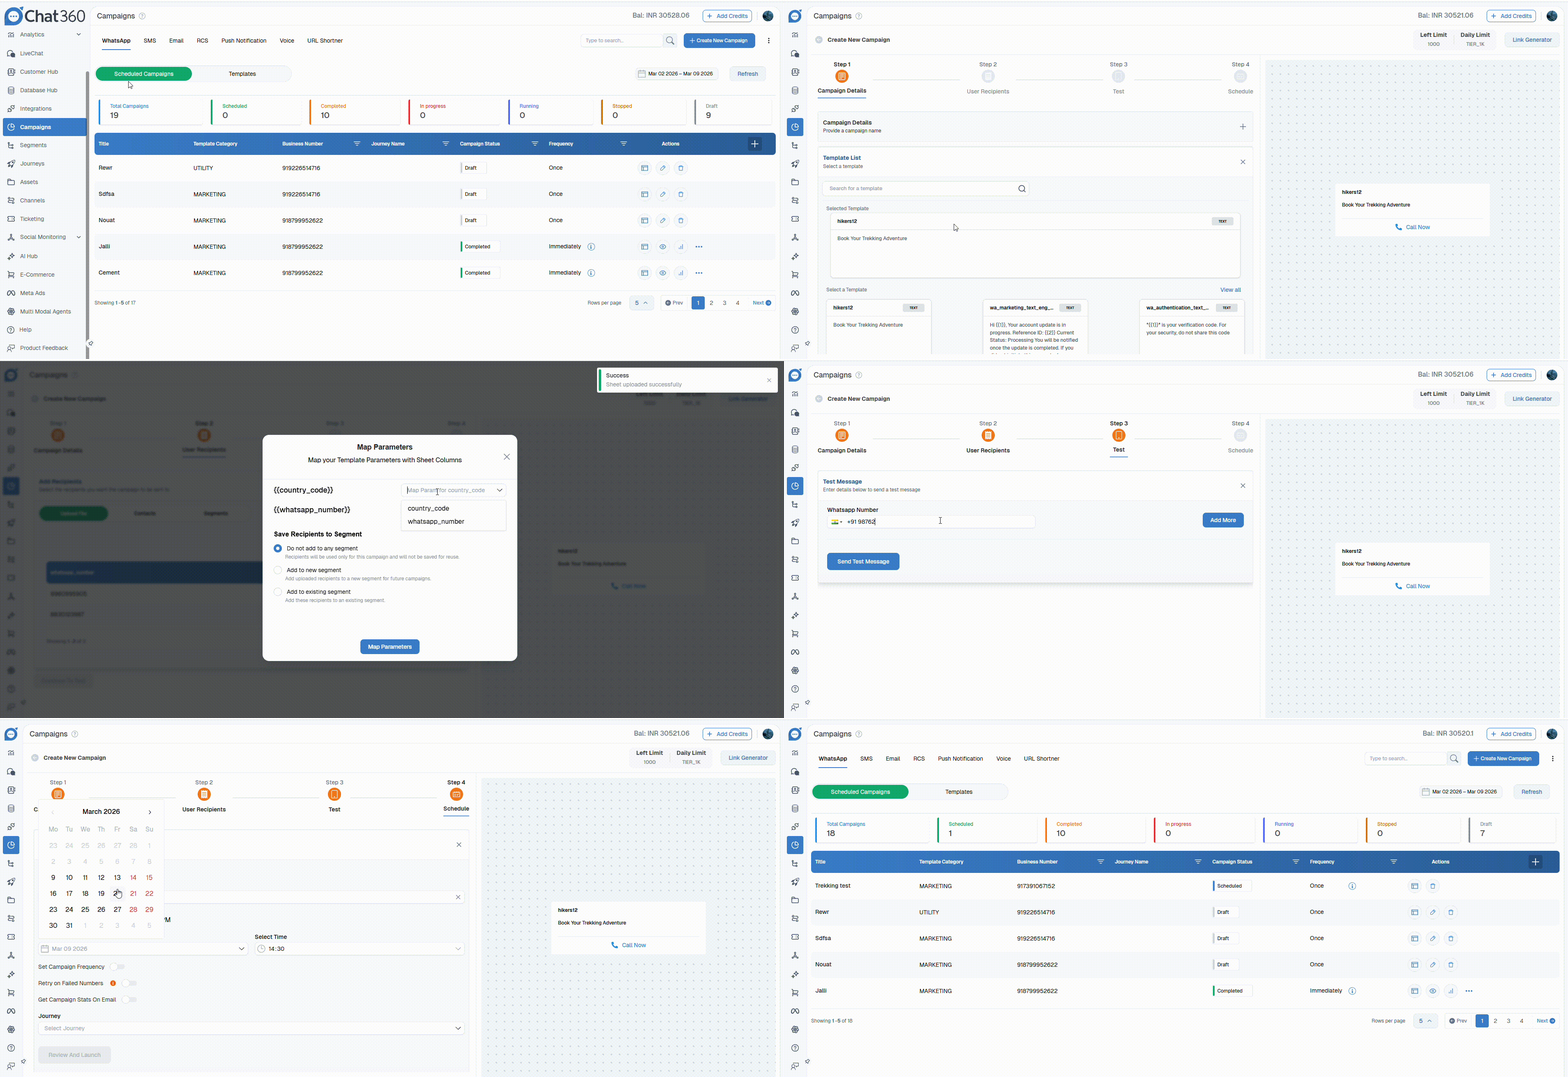
Step 2- Create A New Campaign
Go to the Scheduled Campaign dashboard. Click on Create New Campaign. You will be redirected to the campaign creation page.
Step 3-Provide Campaign Details
Fill in the required campaign details:** Enter the Campaign Name. Select the Business Number from which the campaign will be sent. Choose the Template for the campaign.
Once selected, the template preview will appear on the right side of the screen. You can configure template fields and attach relevant media if required.
Step 4- Add Contact Data
Import the contact data of the end users who will receive the campaign. You can add data using one of the following methods:
Option 1: Upload File
Upload a CSV or Excel file. Ensure numbers include country code and are in the correct WhatsApp number format. Map the sheet parameters with the template variables.
Option 2: Contacts
Select contacts using Tags stored in the Customer Hub. Add attributes such as email, name, or location if required Click Apply Changes to add selected contacts to the campaign.
Option 3: Segment
Select from previously created Segments. 2.Use segmented data for targeted campaigns.
Step 4: Test the Campaign
Before launching, test the campaign to verify content and configuration:
Add up to 3 test numbers
Click Send Test Message
Confirm whether the message is received correctly
Once verified, proceed to launch.
Step 5: Configure & Schedule the Campaign
In the final step, configure campaign settings using the available toggles:
Schedule Campaign : Enable this option to select the date and time when the campaign should be triggered.
Set Campaign Frequency: Enable this option to define recurrence (Daily, Weekly, or Monthly).
Retry on Failed Numbers: Improves delivery rates by automatically retrying failed messages. To enable:
Turn on Retry on Failed Numbers. Select retry interval (24 hours to 3 days) Set maximum retry attempts (up to 3 times) The system will automatically retry failed messages based on your configuration. No manual intervention is required.
Get Campaign Stats on Email
Enable this option to receive campaign statistics via email. You can add up to three email addresses.
Journey
The Journey feature allows you to create automated, multi-channel workflows across WhatsApp, SMS, Email, Push, and Webhooks. For more details, refer to the Journey documentation.
Step 6: Review and Launch
Click Review and Launch to verify campaign details.
Review all configurations in the confirmation window.
Click Launch to start the campaign.
Alternatively, click Save as Draft to store the campaign and edit or launch it later. Your WhatsApp campaign is now successfully configured and ready to run.
Before sending a WhatsApp campaign, templates must meet the following criteria:
Use Approved Templates Only: Templates must be approved by WhatsApp.
Content Restrictions:
No emojis, media, or URLs allowed in the initial template.
Parameters should be concise (less than 15 characters).
Add-on Features: Optionally, add a one-time-password (OTP) button for secure interactions (e.g., Copy Code or One-Tap).
WhatsApp Campaign Analytics:
Navigate to Campaign Stats:
Click on WhatsApp campaign →Schedule Campaign → Go to an action section of that particular campaign → Task Stats.
Key Metrics:
Uploaded Recipients: All the data that was uploaded or utilised for sending.
Sent to Meta: The message count that was sent to the meta for processing.
Successful count: Total messages that were sent to meta and are not failed.
Failed Count: All the messages that were unsuccessful while sending or fetched webhook responses
Delivered Count: Total messages that were delivered successfully.
Read Count: The total messages that were read successfully.
Total Response Count: The total number of counts of users who clicked on the Quick Reply Button and free text messages.
Actual Response count: Total number of counts of users who clicked on the Quick Reply button.
Successful rates: Total percentage of messages successfully sent.
Use case Examples:
E-commerce: Send a cart-abandonment reminder campaign with retry and personalization.
FinTech: Notify users of loan approval or EMI due dates via scheduled templates.
EdTech: Share course start dates and reminders with enrolled students.
Retail: Launch festive offers via WhatsApp templates with tracking URLs.