SMS Marketing Campaigns
Reach customers instantly with SMS marketing campaigns. Build personalized messages, test them, schedule delivery and track campaign performance in Chat360.
SMS Campaigns in Chat360 allows businesses to send bulk text messages to customers for marketing, transactional, and Service-related communication. SMS is fast and reliable with high open rates, it is ideal for time sensitive and important updates. You can use SMS Campaign to engage customers,share updates, and drive conversations directly through messaging. You need to create and Approve the SMS template before creating the SMS campaigns.
Step to create an SMS campaign:
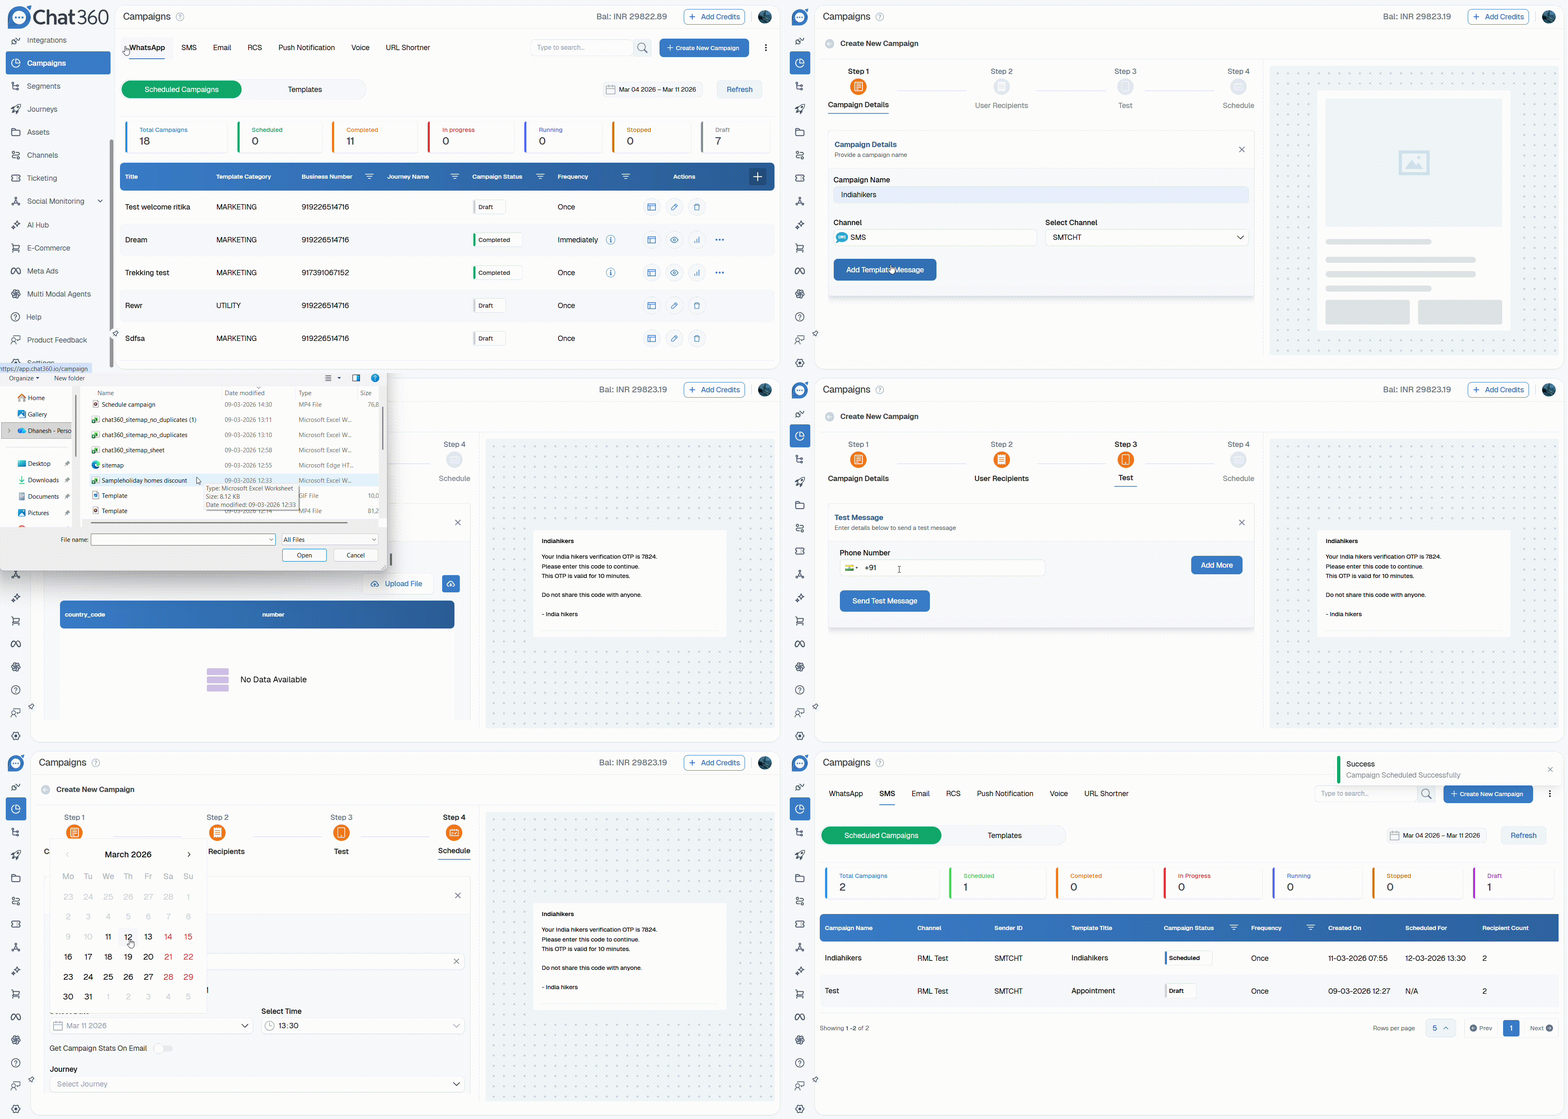
Step 1: Go to the campaign section
click on ‘“SMS' tab then a new window will open showing a “scheduled campaign” and “template”.
Step 2: Create a New Template
Click on the Template tab.
Select Create New Template.
A new window will open.
Enter the required template details, including:
Title
Template Type
Template ID
Channel
Add the template content.
Click Add Template to save it.
The newly created template will be listed in the Templates section table.
Step 3: Create and Configure the Campaign
Go to the Scheduled Campaign section under SMS Campaign.
Click on Create New Campaign.The campaign setup consists of four steps.
Enter the required campaign details:
Campaign Name
Select the Channel (choose the number from which the campaign will be sent)
Click on Add Template Message.
Select a previously created template from the list.
Click Continue to Add Recipients to proceed to the next step.
Step 4- Add Contact Data
Import the contact data of the end users who will receive the campaign. You can add data using one of the following methods:
Option 1: Upload File
Upload a CSV or Excel file.
Ensure numbers include country code and are in the correct WhatsApp number format. Map the sheet parameters with the template variables.
Option 2: Contacts
Select contacts using Tags stored in the Customer Hub. Add attributes such as email, name, or location if required Click Apply Changes to add selected contacts to the campaign.
Option 3: Segment
Select from previously created Segments.
Use segmented data for targeted campaigns.
Select the appropriate method to Add the recipients to the campaign then click on "continue to test”
Step 5: Test the Campaign
Add the phone number on which you want to test the campaigns. Maximum 3 contacts you can add to test the SMS campaign. Then confirm whether you have received the campaign or not.
Step 6: Schedule Campaign
Enable this option to select the date and time when the campaign should be triggered.
Get Campaign Stats on Email
Enable this option to receive campaign statistics via email. You can add up to three email addresses. Then select the journey of the campaign.
Step 7: Review and Launch
Click Review and Launch to verify campaign details. Review all configurations in the confirmation window. Click Launch to start the campaign.
Alternatively, click Save as Draft to store the campaign and edit or launch it later.
SMS Campaign Analytics:
SMS Campaign Analytics provides detailed insights into the performance of your SMS campaigns. It helps you track delivery status, engagement metrics, and overall campaign effectiveness to optimize future communication.
1. Navigate to Campaign Stats:
Click on SMS campaign →Schedule Campaign → Go to an action section of that particular campaign → Task Stats.
Key Matrics:
Uploaded Recipients: All the data that was uploaded or utilized for sending.
Successful Count: Total messages that were successful.
Failed Count: All the messages that were unsuccessful while sending or Fetched webhook responses.
Delivered Count: Shows the total messages that were delivered successfully.
Successful Rate: Total percentage of messages successfully sent.
Unsuccessful Rate: Total percentage of messages unsuccessful.
Delivery Rate: Total percentage of messages delivered.