Schedule Campaign
Use Chat360 Campaign Scheduler to create, test and schedule WhatsApp, SMS, Email, RCS, Push, Voice and Telegram campaigns with automated retries.
Schedule campaign is used to create the campaign in WhatsApp,SMS,Email,Rcs,Push notifications, voice and telegram. In the scheduled campaign section you can see the cards which give the overview of Total campaigns ,scheduled, completed, Inprogress,Running , Stopped and draft of the campaigns. scheduled Campaigns dashboard comprises a table that displays important scheduler and campaign details including:
Campaign Name: Name given to the campaign.
Template Category: Category of the template that is used in the campaign.
Business Number: The number used for sending the campaign on behalf of the company.
Template Title: The title of the template used in the campaign.
Journey Name Is the unique name given to a campaign flow that you create inside the Campaign Scheduler.
Campaign Statuses : The current status of the campaign scheduler(e.g. In Progress, Scheduled, Running, Completed or stopped).
In progress: This means the campaign is currently running and messages are being sent out and you can also see how much of the campaign has been completed. Scheduled: If you have set up a campaign to start in the future, it will have a “scheduled” status, meaning it’s not active yet but will be at the specified time. Running: When a campaign is set to repeat daily, weekly, or monthly and has already run at least once, it’s considered “Running”. This shows its ongoing campaign with a regular schedule. Completed: This status indicates that the campaign has finished and there is no more scheduled run in the future. Stopped: This means someone manually stopped the immediate frequency campaign.
Frequency : How often the scheduler runs according to set frequency ( Daily, Weekly, Monthly).
Last Executed : It shows the date of the campaign that was executed last time. (Please confirm whether its time or date )
Next Execution Time : It's a scheduled campaign time that the campaign is going to be executed. Actions : choice for editing or deleting the scheduler. Also you can see the campaign matrics, copy and download the campaigns. Date Filter - Allows you to sort out and view the campaigns based on the selected date range for easier tracking and analysis.
How to schedule the campaign
To create a new campaign, go to the Scheduled Campaign dashboard and click on Create New Campaign. You will be redirected to the campaign creation page, where you need to complete four sequential steps.
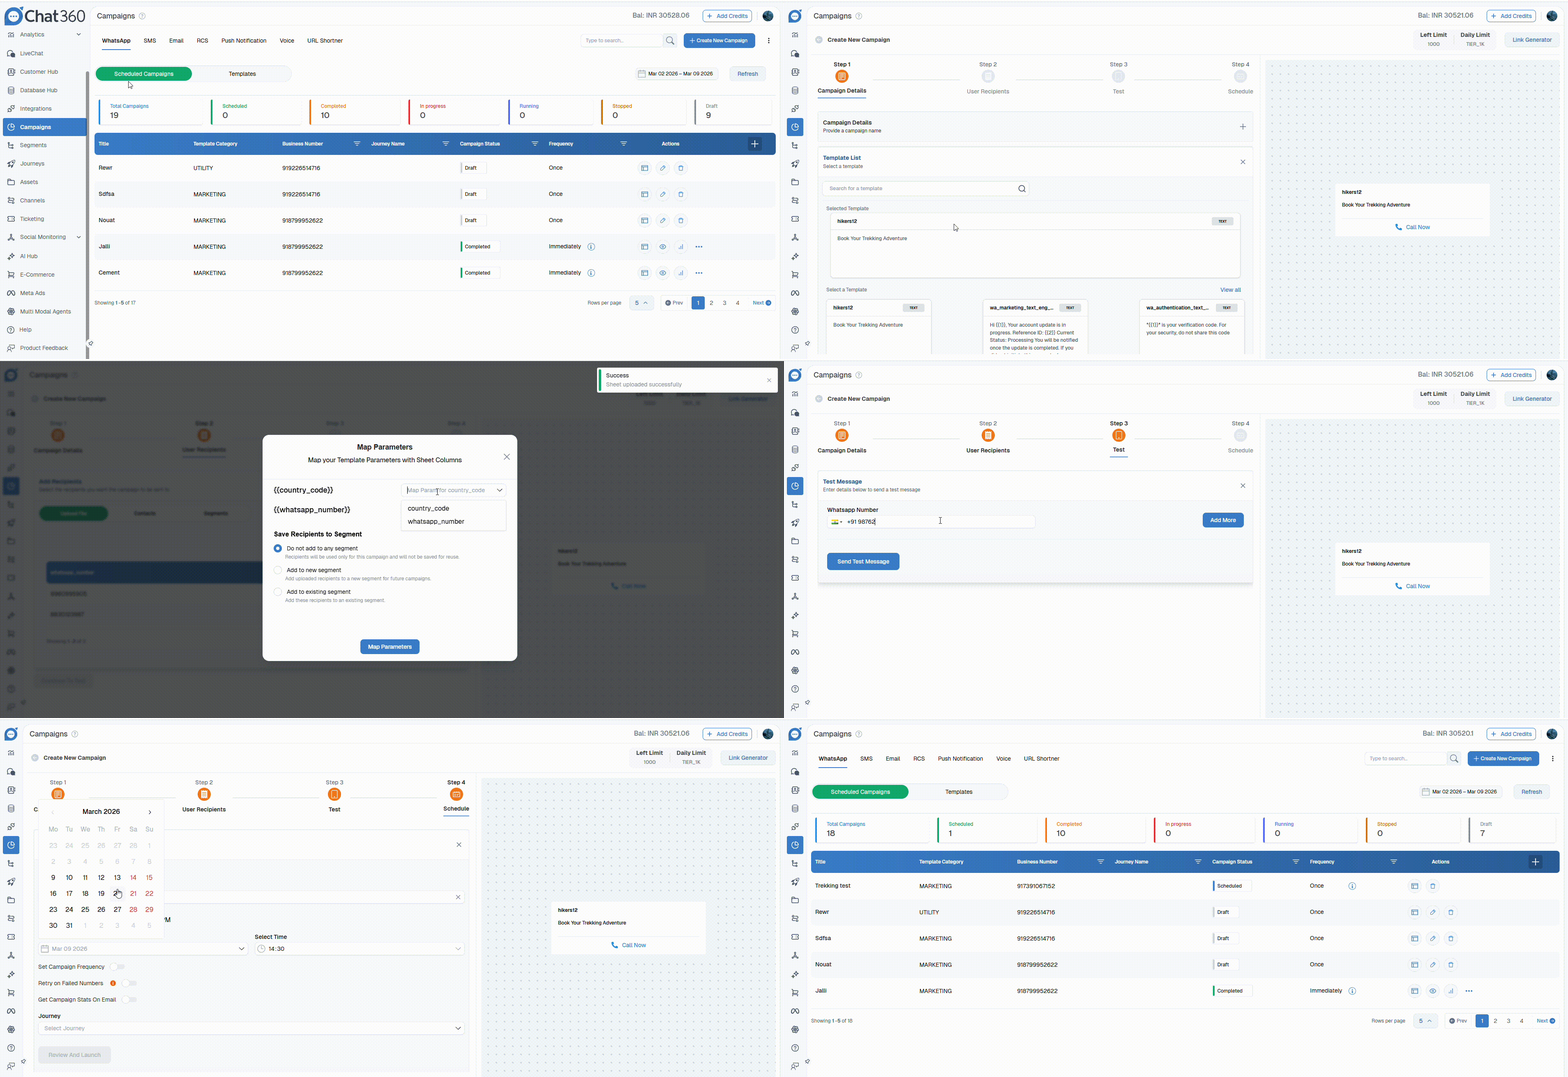
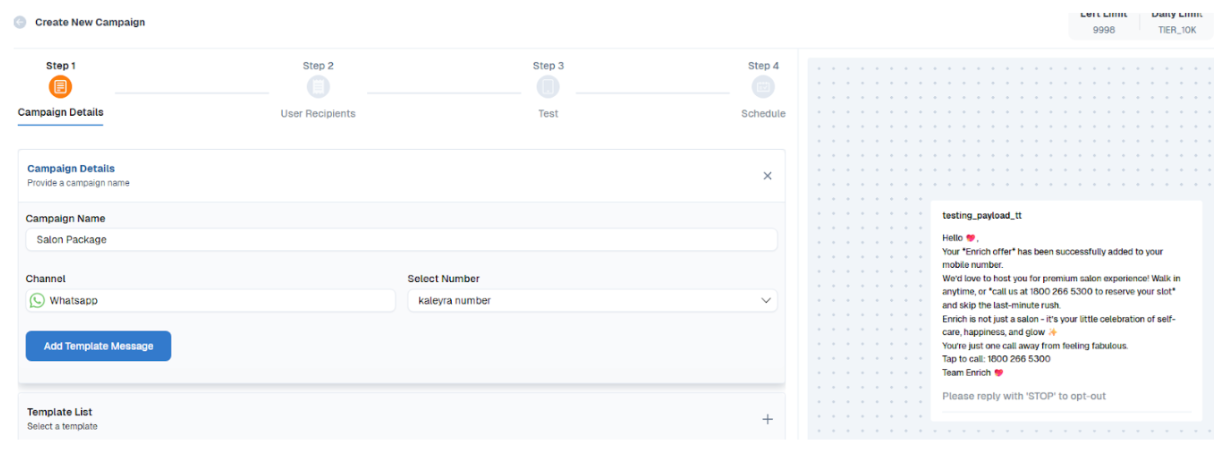
Step 1: Provide Details - In the first step, fill out the campaign details form.
You will need to:
Enter the Campaign Name Select the Business Number from which the campaign will be sent
Choose the Template for the campaign
Once a template is selected, it will appear on the right side of the screen. From there, you can configure the template fields and attach relevant media, if required.
Step 2 - Import the contact details of the users who will receive the campaign using one of the following options:
Upload File: Upload a CSV or Excel file with country code and correct WhatsApp number format, then map the fields with template variables.
Contacts: Select contacts using existing Tags from the Customer Hub and apply changes.
Segment: Choose from previously created Segments for targeted campaigns.
Step 3: Test the Campaign In this step, verify that the correct template, content, and media are selected.
Add up to 3 test numbers.
Click Send Test Message.
Confirm that the message is received correctly in the confirmation window.
Once verified, you can proceed to launch the campaign.
Step 4 - In this last step you can configure and schedule the campaign by following Toggles:
Schedule Campaign : Enable this toggle to select the specific date and time when the campaign should be triggered.
Set Campaign Frequency : Turn on this option to define how often the campaign should repeat (e.g., daily, weekly, or monthly), A configuration prompt will appear once enabled.
Retry on Failed Numbers: This feature automatically retries messages that fail to deliver, improving overall campaign reach. Enable the Retry on Failed Numbers toggle. Select the retry interval (24 hours to 3 days). Set the maximum retry attempts (up to 3 times). Once configured, the system will automatically retry failed messages based on your settings.
Get Campaign Stats On Email: Enable this toggle to receive campaign statistics via email. You can enter up to three email addresses in the provided field.
Journey :The Journey feature enables businesses to create automated, multi-channel messaging workflows that deliver personalized and timely customer experiences across platforms like WhatsApp, SMS, Email, Push, and Webhooks.
After configuring these settings, click Review and Launch to verify all campaign details. A confirmation prompt will appear, allowing you to review the setup before clicking Launch. You also have the option to Save as Draft, which lets you store the campaign and edit or launch it later as needed.